Missouri State University

Skip to content Skip to navigation
a b c d e f g h i j k l m n o p q r s t u v w x y z

Web Strategy and Development Blog

  • Web strategy and development
  • Services Offered
  • @msuweb

Accessibility series: Headings

November 7, 2017 by Alyson Jones

Student working on computer

Welcome to our series of posts called, “How to make your website accessible.” So far we have discussed the ethical and legal reasoning behind accessibility, how to write alternative text, checking color contrast, and how to write descriptive links. The accessibility journey is moving onward with the discussion of headings.

Headings vs. paragraphs

A heading is a short phrase describing what a succeeding section is all about. Headings help users determine the overall outline of a document and navigate to specific information on a page. Headings are bold and bigger compared to normal paragraph text. Headings need <h> tags while paragraph text need <p> tags. The images below display the Source View and Rich Text view to better understand the code behind headings and paragraphs.

Heading ranks

Headings are nested according to level or rank. Heading 1 is the most important heading, whereas heading 6 is the least important. Headings with an equal or higher rank start a new section, headings with a lower rank start new subsections that are part of the higher ranked section. In Web Press, Heading 1 is the title of the web page, while Heading 2 serves as a main section.

Heading HTML tags

Heading tags are used to create headings. They are defined with the <h1> to <h6> tags, telling browsers and search engines that this is the most important text on the page.

If you are using Web Press or WordPress, these tags are placed automatically when a heading is selected. If you notice a heading issue but can’t figure out the problem behind it, the HTML elements will likely uncover the issue. In Web Press, click View Source inside the text window to find HTML. In WordPress, click Text in the upper right window tab. You don’t have to be a coding expert to fix headings in HTML as long as you know the heading tags below:

<h1>Heading 1</h1>
<h2>Heading 2</h2>
<h3>Heading 3</h3>
<h4>Heading 4</h4>
<h5>Heading 5</h5>
<h6>Heading 6</h6>

Improving readability

Headings support visual readability. Internet readers tend to inspect webpages in blocks and sections. Splitting information into logical chunks based on headings allows the skimmers to quickly find what they need. Informative and concise headings are effective, giving readers a preview of the information. It is critical to ensure headings have a logical structure.

Increasing accessibility

Users with visual impairments may have headings read aloud by a screen reader. The screen reader will compile a list of headings, rather than reading aloud the entire page. This allows those with visual impairments to easily jump through a website’s sections and navigate to a particular set of information. Heading structure is one of the most important accessibility considerations.

Optimizing search ranking

Search engine optimization (SEO) is the process website owners use to help search engines find, index and rank their web pages — hopefully above others. Instances of <H> tags in text tells a browser—and of course, Google—that the text is important. When a user is searching for specific information, headings communicate to search engines what a website is all about. Because headings are important to users, they directly affect search rankings and optimization.


Ask the Web Help Desk

Why can’t I use bold text instead of a heading?

This is a frequently asked question at the Web Help Desk. Web Press users tend to love the bold look opposed to the smaller, gray Heading 2. In all circumstances, it is best practice to use a heading rather than bold. This will code your heading with the proper <H> for accessibility and search engine optimization.

On a side note: Headings are written in sentence case and don’t include punctuation. This means you only capitalize the first letter of the first word and proper nouns. (Ex: Web content management system)

Even if you think it looks better another way — trust the Help Desk.

How do I access headings in Web Press?

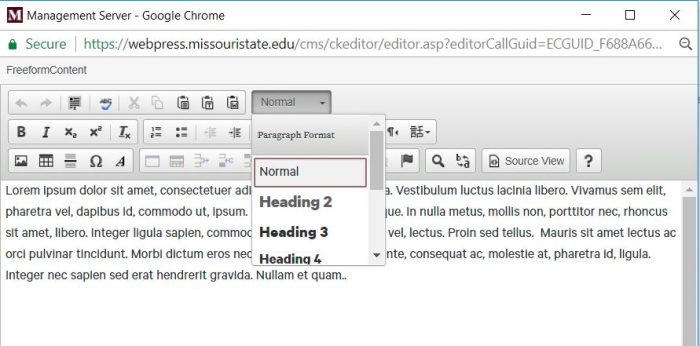
In Web Press, the heading size and color style is set as pre-set. Follow these steps to set a heading:

  1. Select the Open Rich Text Block red dot.
  2. Select the Edit Content red dot.
  3. Highlight the text you wish to make a heading.
  4. Select the heading drop-down list.
  5. Select the appropriate heading in the drop-down menu.
  6. Select OK.

Freeform content block

How do I change the page title?

In Web Press, the Heading 1 is the title of a page. Follow these steps to the change the page title:

  1. Go to the page you are editing in the SmartEdit.
  2. Select the Open Web Page red dot at the top of the page.
  3. Right-click anywhere on the page.
  4. From the drop-down menu, select Edit Properties.
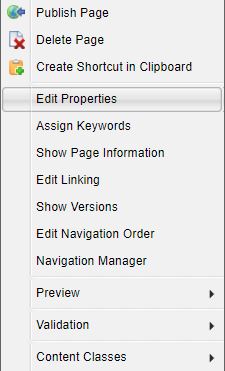
    Edit properties drop-down menu
  5. In the Edit Properties window, type your new page title in the Headline box.
    Edit properties window
  6. Select OK.

How do I access headings in WordPress?

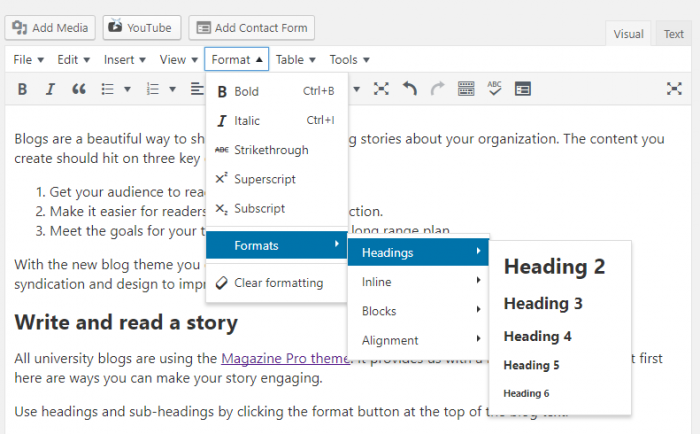
Follow these steps to set a heading in WordPress:

  1. Select Format from the toolbar menu.
  2. Move down the drop-down list and select Formats.
  3. Select Headings
  4. Select the heading you wish to use.
    image of dropdown from the format button at the top of the blog to the headings sub-menu

Further questions?

If you have any questions or need further assistance, please contact the Web Developer Help Desk at WebPress@MissouriState.edu or call 417-836-5271 between the hours of 1 p.m. and 5 p.m. on normal business days.

Filed Under: Accessibility, web strategy and development Tagged With: Accessibility, Headings, Web Press, WordPress

Tips for applying the new blog theme to your site

October 25, 2017 by Erika Brame

person at computer

Blogs are a beautiful way to share timely and engaging stories about your organization. The new theme offers ways you can improve your posts, design your site and track stories.

  1. The blog’s features provide a creative way to tell a dynamic story which is easy to read.
  2. Plugins and widgets offer customization of your site and social sharing.
  3. Your team can access real time analytics to help improve your digital strategy.

With the new blog theme, you can enhance your posts and utilize additional features like plugins, syndication and design for improved quality.

Post features

All university blogs are using the Magazine Pro theme. It provides us with a lot of great features you can use to make your story more engaging.

Structuring the blog

The use of headings allows readers to easily scan related content to find relevant information. Use headings and sub-headings by clicking the format button at the top of the blog text.

image of dropdown from the format button at the top of the blog to the headings sub-menu
Using the format tool allows all your blog posts to maintain the same structure and flow.

Another feature Amanda Isaacs, new media specialist intern for the office of web and new media, uses in her posts is block quotes.

“Block quotes grabs the reader’s attention and it draws them in to read the story,” Isaacs said.

image of adding block quotes by clicking the double quotes in the menu bar at top of the blog
Highlighting interesting or persuasive content with the new blog theme helps readers digest the information.

The new theme also provides a variety of ways you can display and upload photos. Adding photography of the subject helps the audience connect with your story.

Students take a selfie
Students participate in campus activities.
John Q. Hammons Fountain Facebook image
The Hammons Fountain is one of the favored places on campus by students and alumni.
Students participate in Playfair for Welcome Weekend.
BearGrads GIF
During graduation students take the stage to become alumni.
Big events like #BearsHomecoming offer another way you can connect with students, faculty, staff and alumni.
During campus events students often take to social platforms to share their experience.

The blog theme allows for a titled mosaic such as the one above or you can also use slideshows, circle cuts and other formats to layout photos for your story.

Photography is extremely important to storytelling today.

Another improvement of this blog theme is the feature image. It sets at the top of your post, giving readers a reason to scroll down. It’s also used on social platforms as the main photo and shows up on your blog feed. You can access it on the right sidebar below the tags and categories field.

image of featured image upload with upload files highlighted
When uploading your feature image, the best practice is to use a 1920 x 1080 crop for your photos. Also, be sure to add alt-text for screen readers.

These are some of the structural pieces you’ll want to use to make your blogs more dynamic and easier for the audience to read.

Setup, plugins and syndication

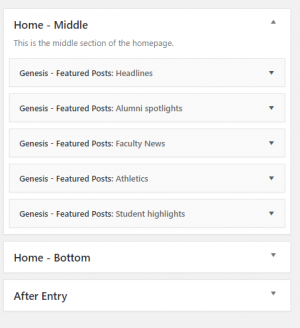
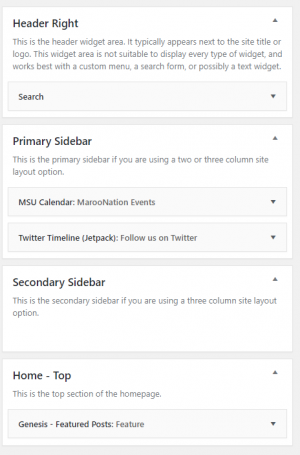
Probably one of the most exciting aspects of the Magazine Pro theme is setting up your homepage and pulling in related content. To access the setup page, go to the left sidebar and select appearance -> widgets. This section allows you to add a calendar widget, subscription box, social feed and select which categories you want featured on the homepage.


image of the categories widget for the blog
Each drop down offers ways you can display each category. The order it appears here is how it shows on the site.
image of sidebar widgets for blog
These are the sidebar content areas where you can add your calendar widget and social feed.
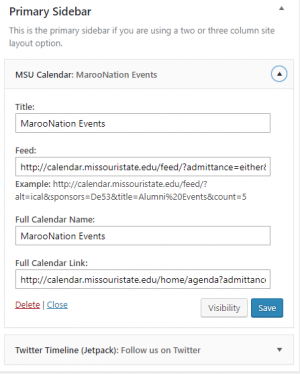
image of primary sidebar widget for blog
This is an example of how to add your calendar widget to your blog.

Now that your blog is setup, let’s use some added features to enhance your writing.

The most with Yoast

Yoast is a plugin that appears at the bottom of your text box within a blog post. It offers help with readability, social sharing cards and more.

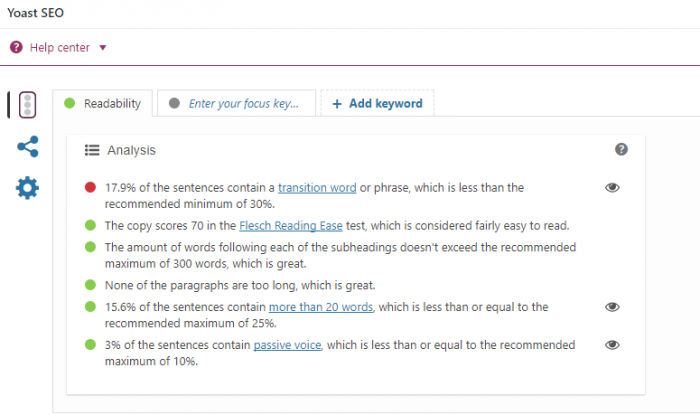
As you write, you can access your readability score on the right sidebar and in the bottom window of Yoast. By clicking on each eyeball, the plugin shows you what to improve.

image of Yoast plugin
The Yoast plugin shows what areas of the copy and structure need improvement.
image of highlighted text by Yoast plugin
The highlighted text shows what needs improvement when you select one of the eyeballs in the plugin.

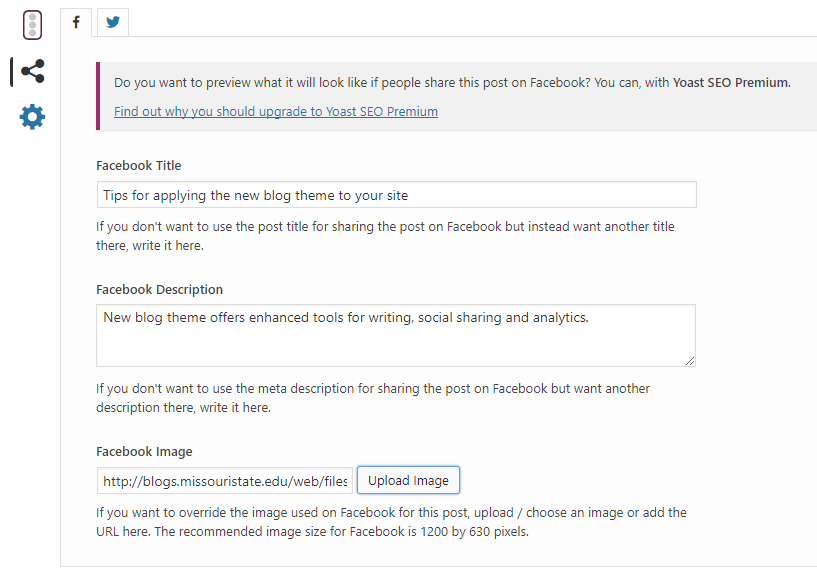
Now that your post is well organized and easy to read, you’ll want people to see it on social media. Use the social sharing cards in Yoast to setup a headline, introductory text and image for all posts on Facebook and Twitter. This way, no matter who shares it, the post has the right message and photo.

image of yoast plugin for social cards
We encourage you to keep the headline the same, but change up your message in the description. You can use different photos for each platform.

The best part is you can toggle over to Twitter and do the same. Now you have a great blog post and strong social cards to encourage people to read the post.

Syndicate relevant content

The CyberSyn plugin allows you to pull in specific posts from other university blogs, like the news blog. This is really helpful for organizations with smaller staffs because it offers more content without much work.

Installation

  1. Upload ‘cybersyn’ to the ‘/wp-content/plugins/’ directory
  2. Activate the plugin through the ‘Plugins’ menu in WordPress

Apply the plugin

  1. Go to “CyberSyn (in the left sidebar) -> RSS/Atom Syndicator”.
  2. Find the “New Feed URL:” copy/paste your RSS feed URL there (e.g.: http://rss.cnn.com/rss/cnn_latest.rss) and click “Syndicate”. You should see the feed settings menu.
  3. Select a “Feed title:” Headlines – News, for example.
  4. Set the necessary options.
    1. We recommend picking one category for it to feed into. Like university news feeds into the headline category.
    2. For the “attribute all posts to the following user” section, select university communications in this scenario. See image below.
    3. In the “Post thumbnail” section, select generate from media attachment thumbnail.
    4. The rest of the plugin options are up to your discretion. Feel free to play with this.
  5. Scroll down the page and click “Syndicate This Feed.” Now the feed is added to CyberSyn.
  6. Enable the check box on the left of its name and click “Pull selected feeds now.” And now you have new posts pulling into your blog.

For more help with developing your syndication, access the ‘Experts’ file on customizing blog feeds.

image of cybersyn plugin
Cybercyn allows you to customize posts and choose when it is displayed on your page.

Measure your success

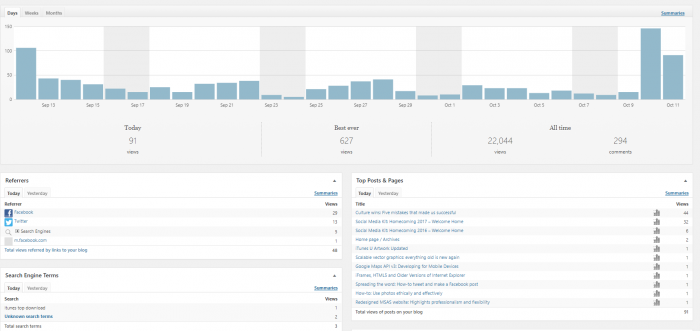
First your organization needs to decide what analytics you’ll want to capture. We can measure just about everything when it comes to digital content, from what device was used to access the information, to which platform it was found. Here is how WordPress can help you measure the outcomes of your blog posts.

  • Using the Jetpack plugin in the top left sidebar, select the drop down “Site Stats.”
  • Here you’ll see several content areas with the overall reach of all the posts in the top bar graph.
  • In the “Top Posts & Pages” tab click on the smaller bar graph on the far right to view a breakdown of specific blog posts.
    • The summarize link in the top right corner offers a breakdown of top performing posts by week, month, quarter, year and all time.
  • You can also view where people got your blog from on the “Referres” tab on the left side.
image of site stats
Use these different views to help you setup your measurements.

The new blog theme provides a variety of ways you can display content, organize your story and keep track of performance.

Filed Under: web strategy and development Tagged With: Accessibility, Blogs, readability, Social Media, WordPress, Yoast

Accessibility series: descriptive links

April 20, 2017 by Mary Chiles

Screenshot of example of descriptive links

Welcome to our series of posts entitled: how to make your website accessible! So far we have discussed the ethical and legal reasoning behind accessibility, how to write alternative text, and how to check color contrast.

In today’s post we discuss writing descriptive links. When you visit a website, do you read every word? Generally readers scan sites for what sticks out to them. Which of these following links makes you want to keep reading?

Click here to learn about Boomer

or:

We’ve just uncovered Boomer’s birth story

Descriptive links entice the reader to learn more. However, if you write “learn more” or “click here” for each link, readers will grow bored and stop following the links. Screen readers translate information into synthesized speech. These screen readers, like people, “jump” from link to link to read information in a logical order.

Tips for accessibility

  • Write descriptive links with important information first.
  • There is no length limit, though you should avoid paragraph-long links.
  • Avoid using URLs as links when the URL is a collection of letters and characters.

How to add links

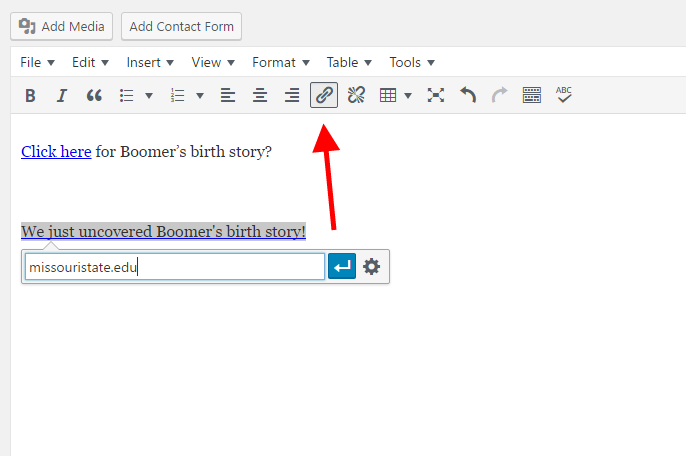
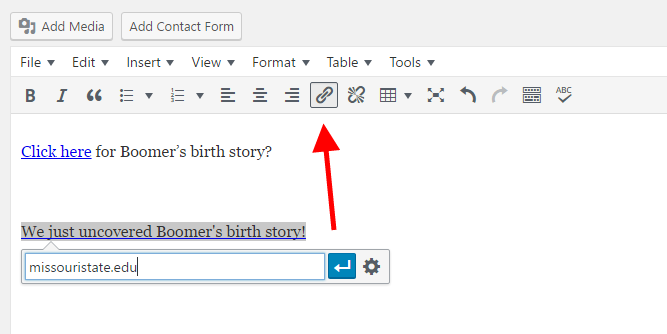
If you are using WordPress, refer to the above Boomer example. Attach link by highlighting the phrase:

Screenshot of example of descriptive links

Click on the chain icon and type the address. The link will appear in blue.

If you are working with Web Press, this video from the Missouri State Web Help Desk shows how to link to webpages.

Filed Under: Accessibility, Web Press, WordPress blogs Tagged With: Accessibility, descriptive links, how-to, Web Press, WordPress

Accessibility series: color contrast

April 7, 2017 by Mary Chiles

Welcome to our series of posts entitled: how to make your website accessible! So far we have discussed the ethical and legal reasoning for why accessibility is important, and how to write alternative text.

Today we focus on color contrast.

Have you tried reading black letters on a red background? What about red letters on a maroon background? You might want to add some color to your website, but how do you ensure your site is still readable?  The color contrast between the text and the background affects readability.

The contrast should be 4.5:1. This is the comparison between relative luminance of the first number compared with the second number. The good news it is easy to check. This color contrast site shows foreground and background color.

How to test

For foreground, click on the box for a color wheel and find the color of the font you are using. Click on the appropriate color to select it. It will show a small square in the color you picked.

Then, for background, repeat this step.  It will also show a small square in the color you picked. You will see a color contrast ratio that automatically adjusts based on your color wheel selections. Make sure the ratio is 4.5:1 or greater.

Let’s return to the initial example. To pick colors, you will want to use the branding recommendations to ensure a consistent appearance.

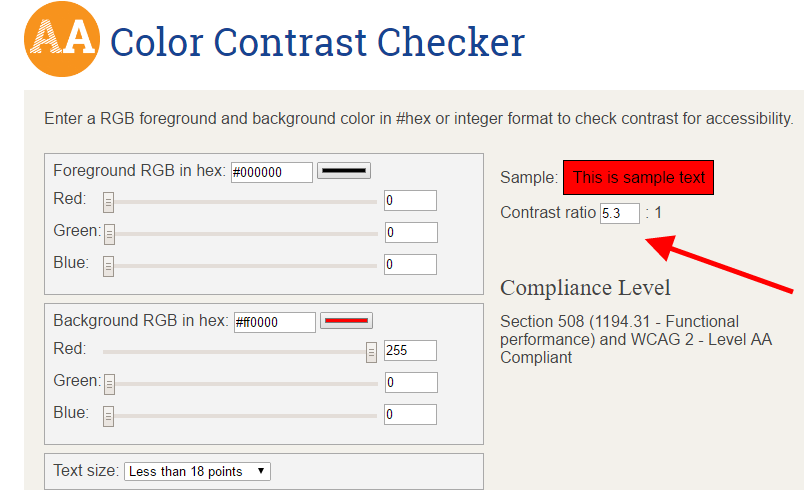
First, let’s check black text against the Brick City Red background:

color contrast checker of black letters on red background

Perfect! The ratio is greater than 4.5:1, so this combination passes accessibility standards.

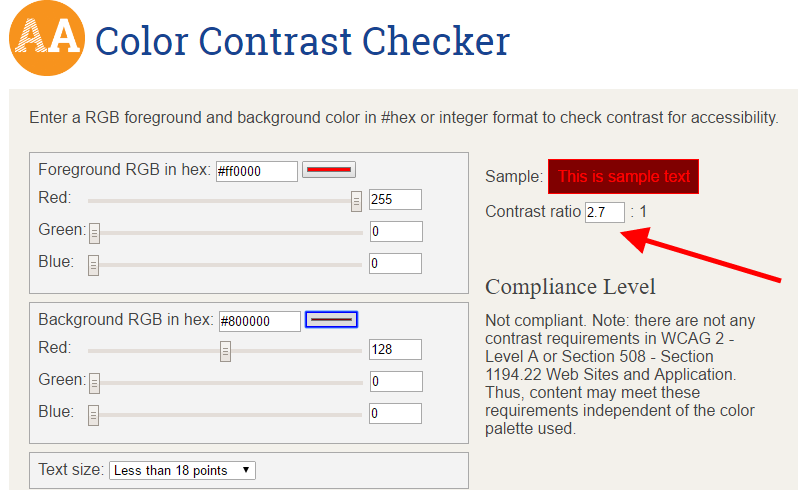
A word of warning: Some color combinations look like they “should” be readable, but are they? For example, take the Brick City Red text on Missouri State Maroon background. Let’s check.

color contrast checker of red type letters maroon background

Nope! The color contrast ratio of 2.7:1 does not meet the accessibility standard of at least 4.5:1.

Filed Under: Accessibility, Web Press, WordPress blogs Tagged With: Accessibility, color contrast, Web Press, WordPress

Accessibility series: alt text

April 3, 2017 by Mary Chiles

Example of WordPress screen for al text

Welcome to our series of posts entitled: how to make your website accessible! In the first post we discussed the ethical and legal reasoning for why accessibility is important.

Today we focus on adding alternative text to images.

Tips for success

It’s a good idea to add images to posts because it drives readers to your site. But how do we make the image work for everyone?

Imagine the pre-smart phone days. You’ve found an image from your days in Brownie Scouts and want to show your best friend. But she lives six hours away. You could make a copy of the photograph and mail it to her, but you can’t wait! So, you call her up on your landline and tell her about the photo. Similarly, alt text is like describing an image so that the website visitor can understand its meaning.

How much should you say? Here are specific ideas to consider while writing alternative text. Don’t begin the text with the words “an image” or “a photo.” Don’t repeat the caption because it is redundant. Do briefly describe the image.

When blogging

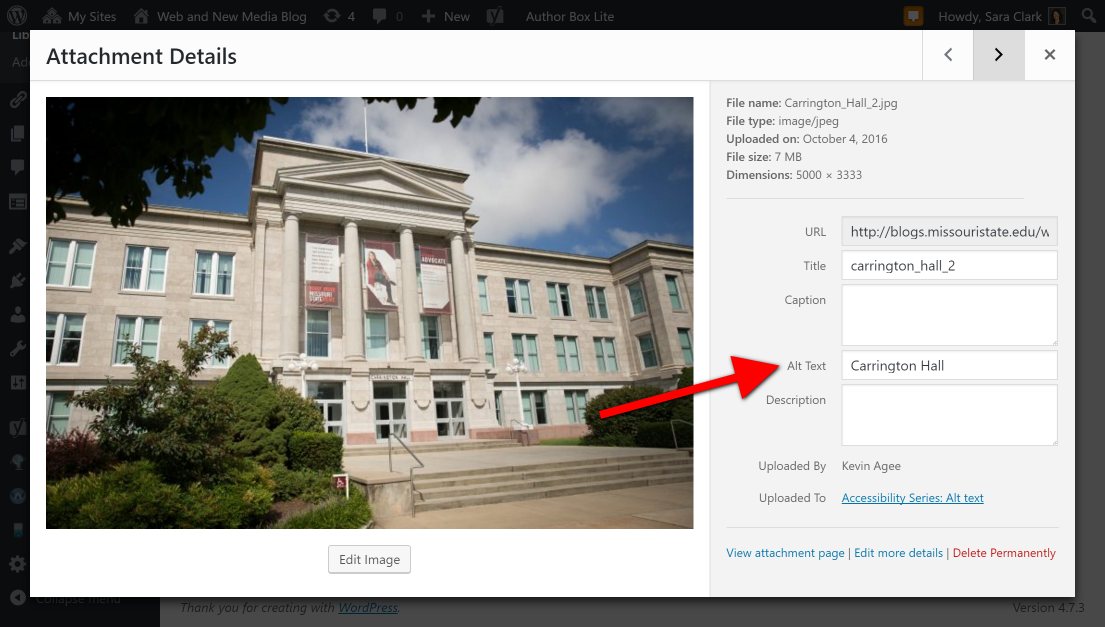
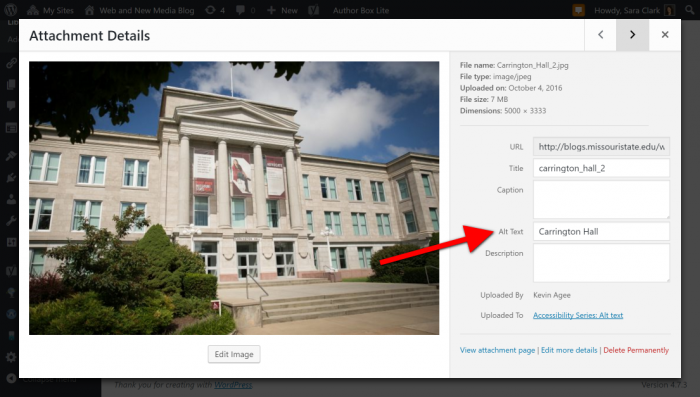
If you post to a Missouri State blog, you use the blogging platform WordPress.  This is how you add alt text within your Missouri State blog.

Screenshot of WordPress page for alt text
Use the Alt Text field when uploading or editing an image in WordPress.

When updating your website

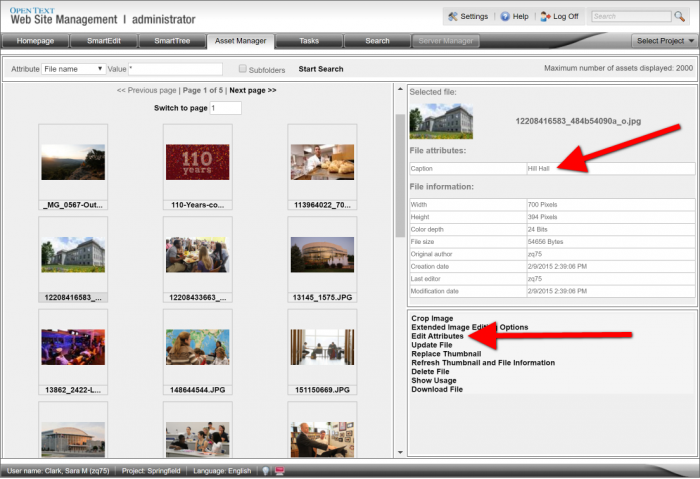
Missouri State webpages are maintained on Web Press. To add images to your site, upload it or select the image in the Asset Manager. You will have the option to add the caption. This is used as the alt text in Web Press.

Web Press screen showing alt text (caption)
Use the Edit Attributes link to add or change the alt text for an image.

How to know if you are successful?

To determine whether your site meets accessibility standards, enter the address into a web accessibility site like WAVE. Find the alt tag on images within the results. If it is green the alternative text is sufficient. If it is yellow it needs attention; it might be too long or too short. If it is red you need to add text.

Screenshot of students taking a photograph of themselves
After you enter your website address into WAVE, review the results for small red, yellow or green squares on each photo to check for acceptable alt text.

Filed Under: Accessibility, Web Press, WordPress blogs Tagged With: Accessibility, alt text, alternative, webpress, WordPress

Next Page »

Subscribe

Enter your email address to subscribe to this blog and receive notifications of new posts by email.

Follow @MSUWeb

My Tweets

Calendar

  • Complete Calendar

Categories

  • Accessibility
  • brand
  • email marketing
  • Mobile
  • News
  • Redesign
    • Academic websites
    • Web redesign 2010
    • Web redesign 2015
  • Social media
    • Social media kit
  • template
    • updates
  • Training
  • Video
  • Web Press
  • web strategy and development
    • Technical
  • WordPress blogs

Meta

  • Log in
  • Entries feed
  • Comments feed
  • WordPress.org

Connect with web strategy and development

  • Twitter

Make your Missouri statementMake your Missouri statement
  • Last Modified: December 12, 2018
  • Accessibility
  • Disclaimer
  • Disclosures
  • EO/AA/M/F/Veterans/Disability/Sexual Orientation/Gender Identity
  • © 2013 Board of Governors, Missouri State University
  • Contact Information