Missouri State University

Skip to content Skip to navigation
a b c d e f g h i j k l m n o p q r s t u v w x y z

Web Strategy and Development Blog

  • Web Strategy and Development
  • Web Support
  • @msuweb

Tips for applying the new blog theme to your site

October 25, 2017 by admin

person at computer

Blogs are a beautiful way to share timely and engaging stories about your organization. The new theme offers ways you can improve your posts, design your site and track stories.

  1. The blog’s features provide a creative way to tell a dynamic story which is easy to read.
  2. Plugins and widgets offer customization of your site and social sharing.
  3. Your team can access real time analytics to help improve your digital strategy.

With the new blog theme, you can enhance your posts and utilize additional features like plugins, syndication and design for improved quality.

Post features

All university blogs are using the Magazine Pro theme. It provides us with a lot of great features you can use to make your story more engaging.

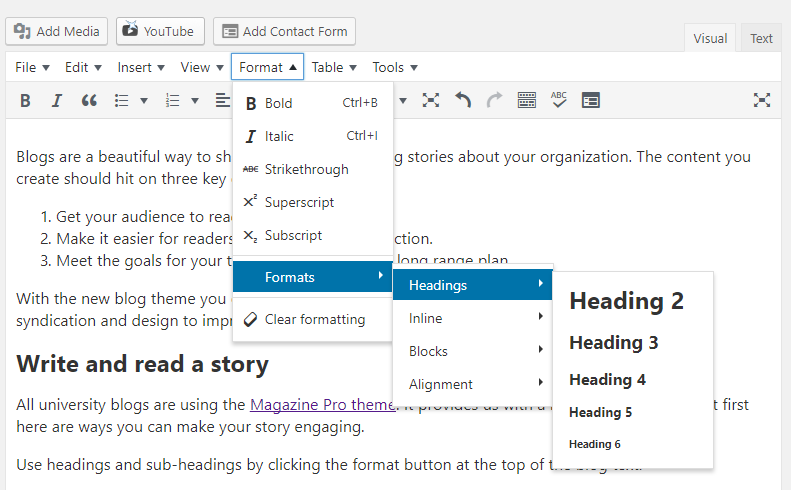
Structuring the blog

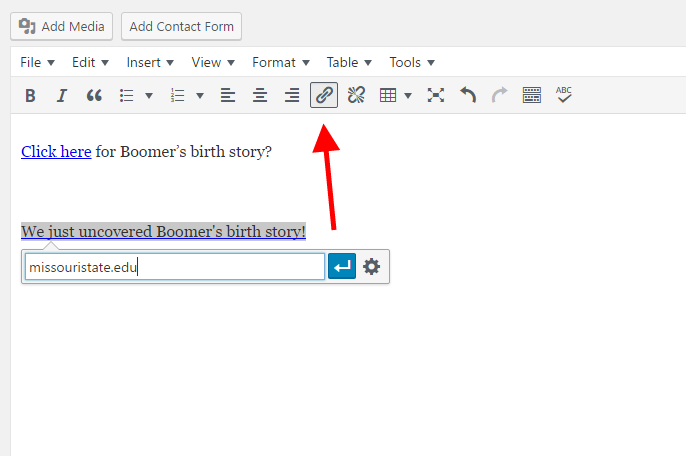
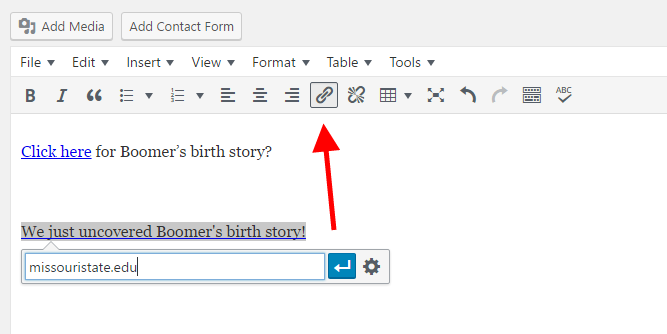
The use of headings allows readers to easily scan related content to find relevant information. Use headings and sub-headings by clicking the format button at the top of the blog text.

image of dropdown from the format button at the top of the blog to the headings sub-menu
Using the format tool allows all your blog posts to maintain the same structure and flow.

Another feature Amanda Isaacs, new media specialist intern for the office of web and new media, uses in her posts is block quotes.

“Block quotes grabs the reader’s attention and it draws them in to read the story,” Isaacs said.

image of adding block quotes by clicking the double quotes in the menu bar at top of the blog
Highlighting interesting or persuasive content with the new blog theme helps readers digest the information.

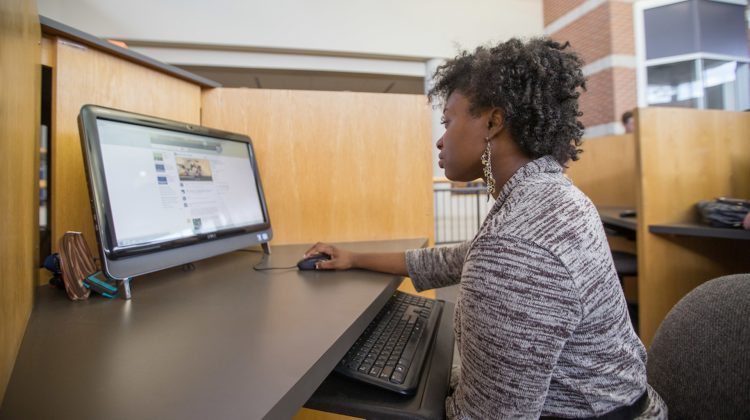
The new theme also provides a variety of ways you can display and upload photos. Adding photography of the subject helps the audience connect with your story.

Students take a selfie
Students participate in campus activities.
John Q. Hammons Fountain Facebook image
The Hammons Fountain is one of the favored places on campus by students and alumni.
Students participate in Playfair for Welcome Weekend.
BearGrads GIF
During graduation students take the stage to become alumni.
Big events like #BearsHomecoming offer another way you can connect with students, faculty, staff and alumni.
During campus events students often take to social platforms to share their experience.

The blog theme allows for a titled mosaic such as the one above or you can also use slideshows, circle cuts and other formats to layout photos for your story.

Photography is extremely important to storytelling today.

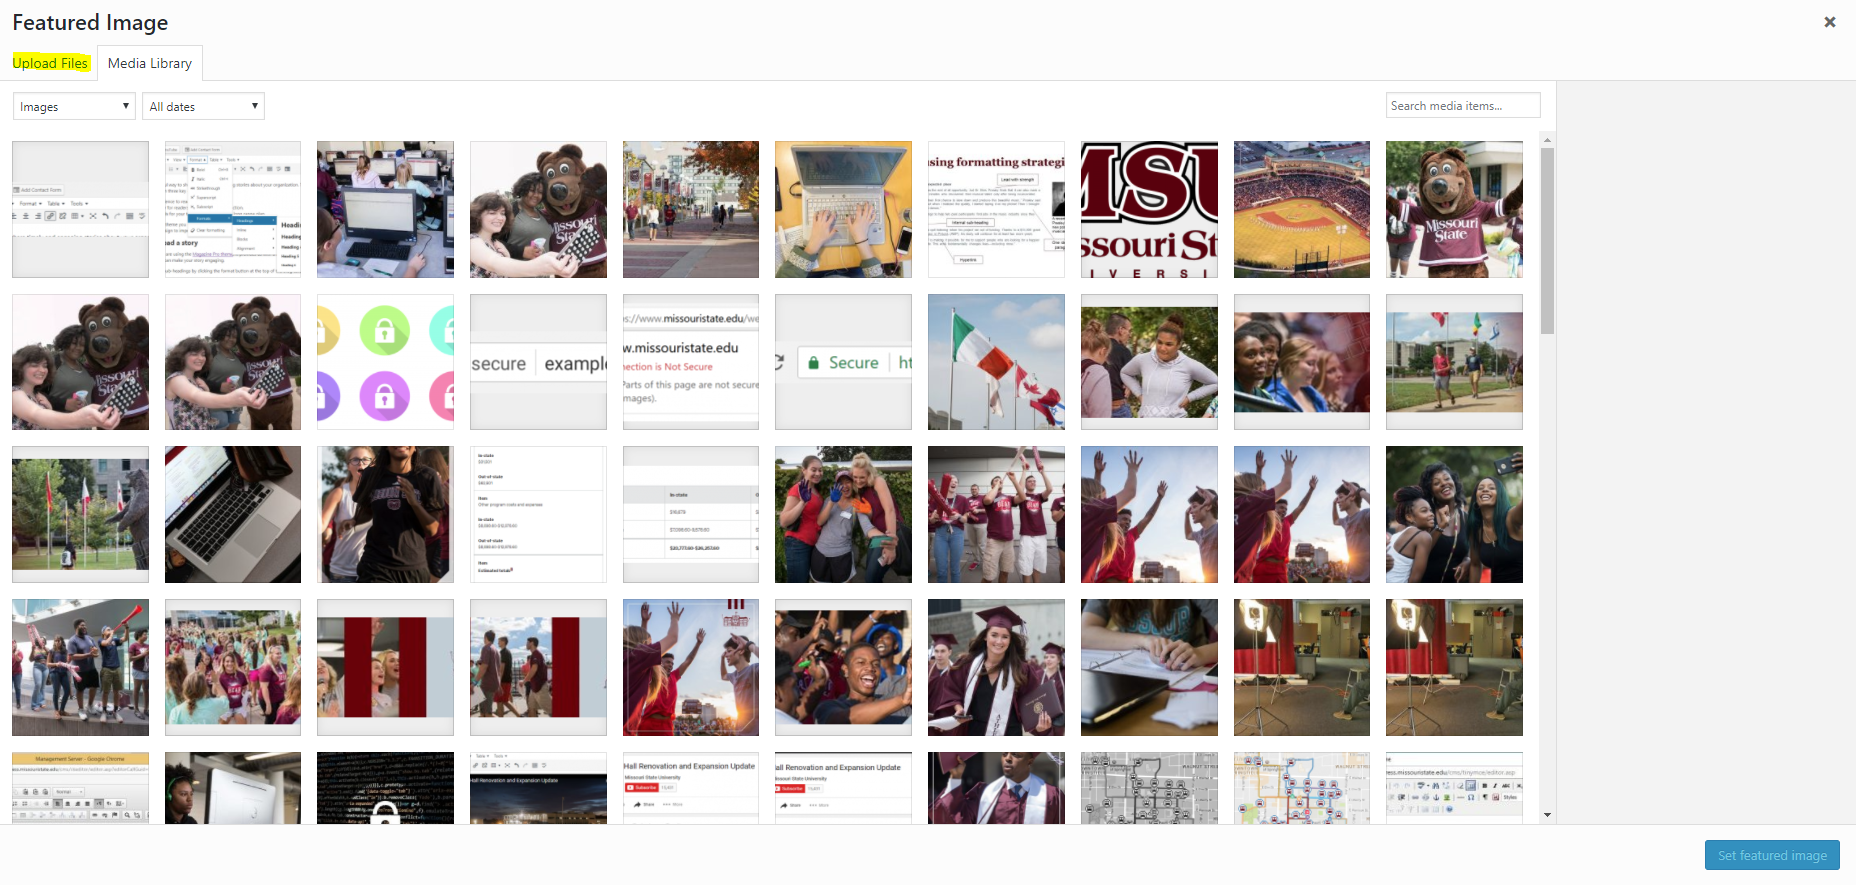
Another improvement of this blog theme is the feature image. It sets at the top of your post, giving readers a reason to scroll down. It’s also used on social platforms as the main photo and shows up on your blog feed. You can access it on the right sidebar below the tags and categories field.

image of featured image upload with upload files highlighted
When uploading your feature image, the best practice is to use a 1920 x 1080 crop for your photos. Also, be sure to add alt-text for screen readers.

These are some of the structural pieces you’ll want to use to make your blogs more dynamic and easier for the audience to read.

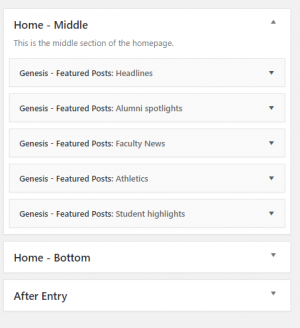
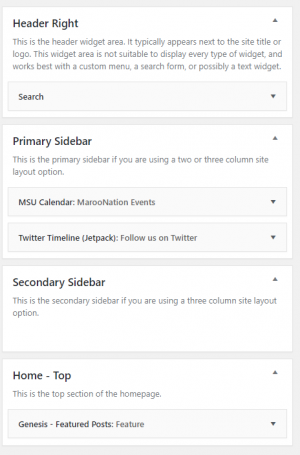
Setup, plugins and syndication

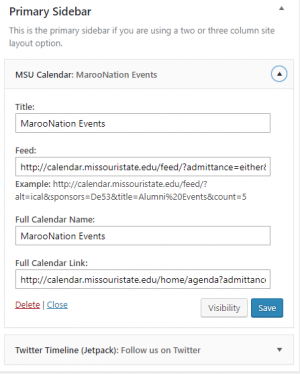
Probably one of the most exciting aspects of the Magazine Pro theme is setting up your homepage and pulling in related content. To access the setup page, go to the left sidebar and select appearance -> widgets. This section allows you to add a calendar widget, subscription box, social feed and select which categories you want featured on the homepage.


image of the categories widget for the blog
Each drop down offers ways you can display each category. The order it appears here is how it shows on the site.
image of sidebar widgets for blog
These are the sidebar content areas where you can add your calendar widget and social feed.
image of primary sidebar widget for blog
This is an example of how to add your calendar widget to your blog.

Now that your blog is setup, let’s use some added features to enhance your writing.

The most with Yoast

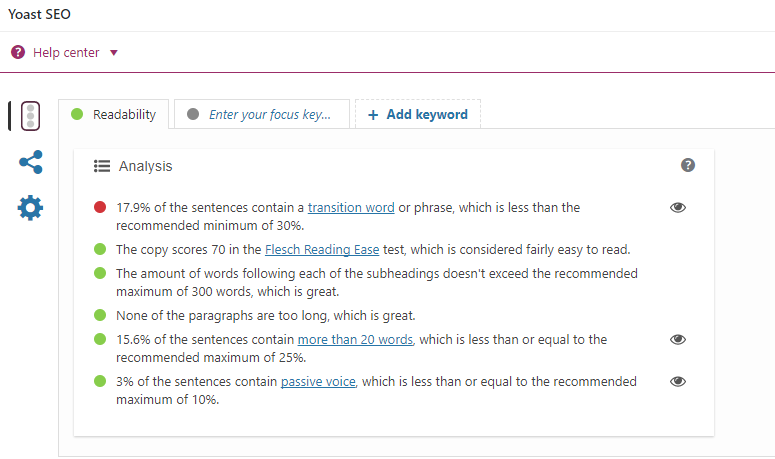
Yoast is a plugin that appears at the bottom of your text box within a blog post. It offers help with readability, social sharing cards and more.

As you write, you can access your readability score on the right sidebar and in the bottom window of Yoast. By clicking on each eyeball, the plugin shows you what to improve.

image of Yoast plugin
The Yoast plugin shows what areas of the copy and structure need improvement.
image of highlighted text by Yoast plugin
The highlighted text shows what needs improvement when you select one of the eyeballs in the plugin.

Now that your post is well organized and easy to read, you’ll want people to see it on social media. Use the social sharing cards in Yoast to setup a headline, introductory text and image for all posts on Facebook and Twitter. This way, no matter who shares it, the post has the right message and photo.

image of yoast plugin for social cards
We encourage you to keep the headline the same, but change up your message in the description. You can use different photos for each platform.

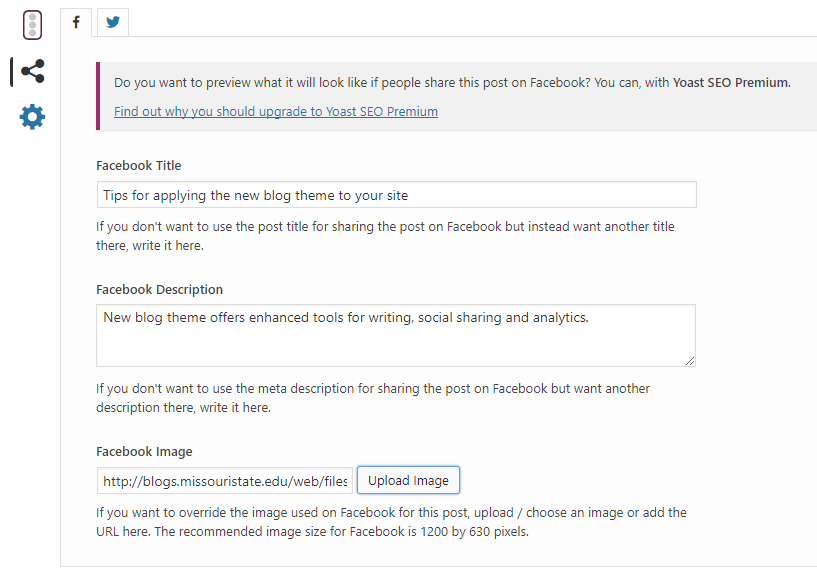
The best part is you can toggle over to Twitter and do the same. Now you have a great blog post and strong social cards to encourage people to read the post.

Syndicate relevant content

The CyberSyn plugin allows you to pull in specific posts from other university blogs, like the news blog. This is really helpful for organizations with smaller staffs because it offers more content without much work.

Installation

  1. Upload ‘cybersyn’ to the ‘/wp-content/plugins/’ directory
  2. Activate the plugin through the ‘Plugins’ menu in WordPress

Apply the plugin

  1. Go to “CyberSyn (in the left sidebar) -> RSS/Atom Syndicator”.
  2. Find the “New Feed URL:” copy/paste your RSS feed URL there (e.g.: http://rss.cnn.com/rss/cnn_latest.rss) and click “Syndicate”. You should see the feed settings menu.
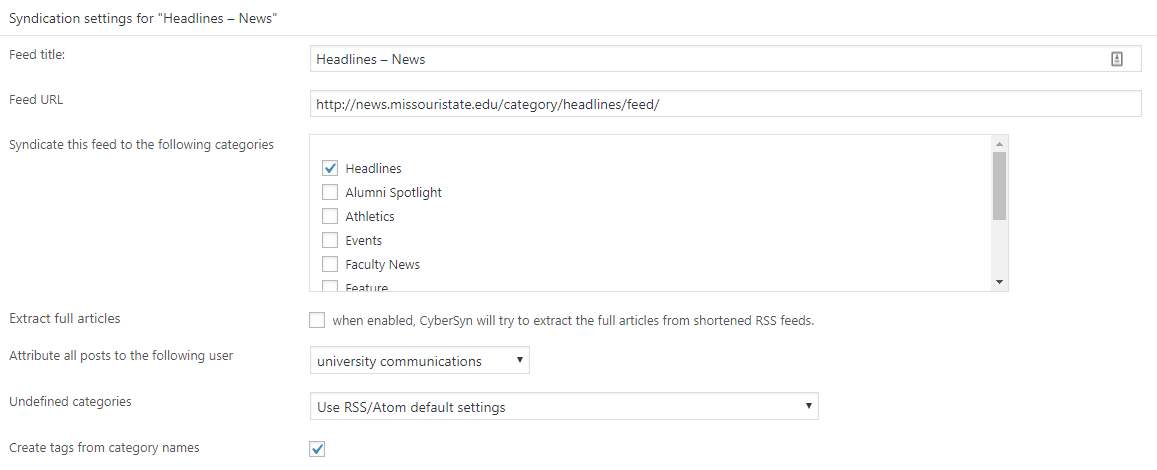
  3. Select a “Feed title:” Headlines – News, for example.
  4. Set the necessary options.
    1. We recommend picking one category for it to feed into. Like university news feeds into the headline category.
    2. For the “attribute all posts to the following user” section, select university communications in this scenario. See image below.
    3. In the “Post thumbnail” section, select generate from media attachment thumbnail.
    4. The rest of the plugin options are up to your discretion. Feel free to play with this.
  5. Scroll down the page and click “Syndicate This Feed.” Now the feed is added to CyberSyn.
  6. Enable the check box on the left of its name and click “Pull selected feeds now.” And now you have new posts pulling into your blog.

For more help with developing your syndication, access the ‘Experts’ file on customizing blog feeds.

image of cybersyn plugin
Cybercyn allows you to customize posts and choose when it is displayed on your page.

Measure your success

First your organization needs to decide what analytics you’ll want to capture. We can measure just about everything when it comes to digital content, from what device was used to access the information, to which platform it was found. Here is how WordPress can help you measure the outcomes of your blog posts.

  • Using the Jetpack plugin in the top left sidebar, select the drop down “Site Stats.”
  • Here you’ll see several content areas with the overall reach of all the posts in the top bar graph.
  • In the “Top Posts & Pages” tab click on the smaller bar graph on the far right to view a breakdown of specific blog posts.
    • The summarize link in the top right corner offers a breakdown of top performing posts by week, month, quarter, year and all time.
  • You can also view where people got your blog from on the “Referres” tab on the left side.
image of site stats
Use these different views to help you setup your measurements.

The new blog theme provides a variety of ways you can display content, organize your story and keep track of performance.

Filed Under: web strategy and development Tagged With: Accessibility, Blogs, readability, Social Media, WordPress, Yoast

Recap: Making Your Statement in a Digital World – Sept. 29, 2017

October 3, 2017 by Kai Raymer

person on laptop

We recently presented Making Your Statement in a Digital World, a comprehensive training session for Missouri State website, blog and social media managers.

Still have questions or need help?

We’re hosting two post-training open labs, to answer your questions and provide support. Please join us. No preregistration is required.

Key details

  • Dates: Friday, Oct. 27 and Friday, Nov. 10
  • Time: 2-4 p.m., both dates
  • Location: Meyer Library 106 Cheek Hall 100
  • About: Both sessions will be held in conjunction with the Web Help Desk open lab.

Access the presentations

The Sept. 29 training session was presented in four parts.

  • Readability
  • Blogging
  • Accessibility
  • Social media and visual platforms
    • Twitter
    • Facebook
    • Visual (YouTube, Instagram, aggregators, Snapchat)

wideshot of people walking on campus

Key takeaways

Readability

  • Use concise text and a scannable layout to make your content more readable. Put the most important information at the top.
  • Always ask, “how does this look on mobile?” Current and future students are researching your department/program on their phones.
  • Write less, people will read more. People will read more of a 300-word article than they will a 600-word article.
  • No one wants to put extra effort into reading. Seventy percent of people read at an intermediate (middle school) level. Newspapers aim for a 7th grade reading level.
  • Headings, bulleted lists and visual elements. Use them.
  • The YoastSEO plugin for WordPress is a great tool for improving your writing.
  • Improving your content readability has many benefits, including audience reach and audience action.

Blogging

  • Does your blog tell a story? Who is speaking in your story and how are you conveying that meaning? It’s important to start in the action and develop some sort of conflict that is resolved.
  • Be sure you are defining your audience; alumni, faculty, staff, and/or students?
  • Utilize the formatting strategies from readability while adding photography and pull quotes.
  • Update your blog with engaging stories at least once a month, if not more.

Students taking photo with Boomer

Accessibility

  • Accessibility means people with disabilities can use and navigate your website.
  • There are federal guidelines for accessibility. MSU, which receives federal funding, falls under WCAG 2.0 Level AA.
  • Think of your website as a public space (i.e. a courthouse or city hall). Make accommodations for all.
  • Accessibility overlaps with readability and best practices for websites. Having an accessible website means your website is better overall.
  • Alt text, headings and descriptive links are crucial for accessibility. Our Accessibility blog series also covers these topics, and more.

Social media and visual platforms

  • Share human – don’t be afraid to act like a human and interact with your audience one-on-one.
  • Set up a Facebook business account where people can find your contact information. Be prepared to respond to their questions.
  • Think visual – when on location for an event share raw photos, but when promoting the event utilize photo services to help boost your presence.
  • Video is king across all platforms. Be sure to add captioning for accessibility and to increase views.
  • Measure your success based off the goals your team sets: more followers, increased engagement, more views, etc. Keep a log of your analytics so you can compare data from previous years.

Students in computer lab

Filed Under: Accessibility, News, Social media, Training, Web Press, web strategy and development, WordPress blogs Tagged With: Accessibility, aggregators, blog, blogging, Blogs, content, facebook, instagram, presentations, readability, snapchat, Social Media, Training, Twitter, Web, web and new media, YouTube

Improve your digital marking strategy at this free training

September 5, 2017 by admin

Boomer with students

Join us for a free half-day session about best practices for websites, blogs and social media. We’ll offer tips and tricks for online marketing and communications.

Making your statement in a digital world

You’ll learn practical strategies for managing websites, blogs and social media. We’ll answer questions like:

  • How do we repurpose our website and blog content and distribute it on social media?
  • What do users want my website, blog or social media to provide?
  • How do we become better strategic storytellers?
  • How can we utilize the newest features of the upgraded blog themes?
  • What are some tips and tricks we can use to make sure our site is accessible for all users?
  • How do we manage messaging on multiple social media channels?
  • What are some advanced strategies to increase our effectiveness on Facebook, Twitter
    and Instagram?
  • How can we best leverage photo and video content?
  • What can we do immediately to make our digital communications more strategic?

Key details

  • What: Making Your Statement in a Digital World, a free training session on websites and social media presented by Erika Brame and Kai Raymer
  • When: 1-5 p.m., Friday, Sept. 29.
  • Where: Karls Hall, room 102
  • Who: Open to faculty, staff and students who manage content for Missouri State University websites, blogs and social media platforms.
  • How: This event is free; registration though My Learning Connection is requested. Please feel free to bring your own laptop or tablet.

Filed Under: Social media, Training, web strategy and development, WordPress blogs Tagged With: Accessibility, blogging, content, marketing, new media, Social Media, Training

Accessibility series: descriptive links

April 20, 2017 by Mary Chiles

Screenshot of example of descriptive links

Welcome to our series of posts entitled: how to make your website accessible! So far we have discussed the ethical and legal reasoning behind accessibility, how to write alternative text, and how to check color contrast.

In today’s post we discuss writing descriptive links. When you visit a website, do you read every word? Generally readers scan sites for what sticks out to them. Which of these following links makes you want to keep reading?

Click here to learn about Boomer

or:

We’ve just uncovered Boomer’s birth story

Descriptive links entice the reader to learn more. However, if you write “learn more” or “click here” for each link, readers will grow bored and stop following the links. Screen readers translate information into synthesized speech. These screen readers, like people, “jump” from link to link to read information in a logical order.

Tips for accessibility

  • Write descriptive links with important information first.
  • There is no length limit, though you should avoid paragraph-long links.
  • Avoid using URLs as links when the URL is a collection of letters and characters.

How to add links

If you are using WordPress, refer to the above Boomer example. Attach link by highlighting the phrase:

Screenshot of example of descriptive links

Click on the chain icon and type the address. The link will appear in blue.

If you are working with Web Press, this video from the Missouri State Web Help Desk shows how to link to webpages.

Filed Under: Accessibility, Web Press, WordPress blogs Tagged With: Accessibility, descriptive links, how-to, Web Press, WordPress

Accessibility series: color contrast

April 7, 2017 by Mary Chiles

Welcome to our series of posts entitled: how to make your website accessible! So far we have discussed the ethical and legal reasoning for why accessibility is important, and how to write alternative text.

Today we focus on color contrast.

Have you tried reading black letters on a red background? What about red letters on a maroon background? You might want to add some color to your website, but how do you ensure your site is still readable?  The color contrast between the text and the background affects readability.

The contrast should be 4.5:1. This is the comparison between relative luminance of the first number compared with the second number. The good news it is easy to check. This color contrast site shows foreground and background color.

How to test

For foreground, click on the box for a color wheel and find the color of the font you are using. Click on the appropriate color to select it. It will show a small square in the color you picked.

Then, for background, repeat this step.  It will also show a small square in the color you picked. You will see a color contrast ratio that automatically adjusts based on your color wheel selections. Make sure the ratio is 4.5:1 or greater.

Let’s return to the initial example. To pick colors, you will want to use the branding recommendations to ensure a consistent appearance.

First, let’s check black text against the Brick City Red background:

color contrast checker of black letters on red background

Perfect! The ratio is greater than 4.5:1, so this combination passes accessibility standards.

A word of warning: Some color combinations look like they “should” be readable, but are they? For example, take the Brick City Red text on Missouri State Maroon background. Let’s check.

color contrast checker of red type letters maroon background

Nope! The color contrast ratio of 2.7:1 does not meet the accessibility standard of at least 4.5:1.

Filed Under: Accessibility, Web Press, WordPress blogs Tagged With: Accessibility, color contrast, Web Press, WordPress

« Previous Page
Next Page »

Categories

  • Accessibility
  • brand
  • email marketing
  • Mobile
  • News
  • Omni CMS
  • Redesign
    • Academic websites
    • Web redesign 2015
  • Social media
    • Social media kit
  • template
    • updates
  • Training
  • Video
  • Web Press
  • web strategy and development
    • Technical
  • Web Support
  • WordPress blogs

Meta

  • Log in
  • Entries feed
  • Comments feed
  • WordPress.org

Connect with web strategy and development

  • Twitter

Make your Missouri statementMake your Missouri statement
  • Last Modified: April 7, 2017
  • Accessibility
  • Disclaimer
  • Disclosures
  • EO/AA/M/F/Veterans/Disability/Sexual Orientation/Gender Identity
  • © Board of Governors, Missouri State University
  • Contact Information
  • Healthcare MRFs
 

Loading Comments...